I created the following script to enable really seamless Windows XP and Linux integration. Just click to any file (as long as the file is shared with the VM) to open it with appropriate Windows program :
thartono@thartono-linux:~$ more bin/visio
#!/bin/bash
echo rdesktop -A -s "'"c:\\seamlessrdp\\seamlessrdpshell.exe C:\\Program Files\\Microsoft Office\\visio11\\visio.exe \"$@\""'" thartono-wxp:3389 -u thartono -p xxxxxx
>~/Desktop/rdesktop.cmd.txt
cat ~/Desktop/rdesktop.cmd.txt | sed "s_/_\\\_g" | sed " s_\\\home\\\thartono\\\data\\\customers_z:\\\customers_g " | sed "s_\\\home\\\thartono\\\data\\\products_z:\\
\products_g " | sed "s_\\\home\\\thartono\\\data\\\shared_z:_g " |sh
rm ~/Desktop/rdesktop.cmd.txt
Wednesday, July 4, 2007
Tuesday, July 3, 2007
VPNC replace Cisco VPNClient
Cisco VPNClient needs to be patched when installed in Ubuntu Feisty Fawn.
If you don't want to run patched software, you could use VPNC :
sudo apt-get install vpnc resolvconf network-manager-vpnc resolvconf
then create the configuration file inside /etc/vpnc , for example /etc/vpnc/abc.conf . Below is the example of abc.conf (ask your VPN server administrator for XXXXXX/YYYYYY below) :
IPSec gateway abc.company.com
IPSec ID XXXXXX
IPSec secret YYYYYY
Xauth username thartono
NAT Traversal Mode cisco-udp
Cisco UDP Encapsulation Port 10000
To connect to abc you just type "sudo vpnc abc"
UPDATE
Thanks for Februaris input, using VPNC we could specify which destination network should be reached using the tunnel interface. Below is the modified vpnc configuration file :
IPSec gateway abc.company.com
IPSec ID XXXXXX
IPSec secret YYYYYY
Xauth username thartono
NAT Traversal Mode cisco-udp
Cisco UDP Encapsulation Port 10000
target networks 171.70.0.0/16 171.71.0.0/16
The last line specifies that any packet destined to 171.70.x.x or 171.71.x.x should be sent via tunnel. Otherwise use different interface, as shown with "route" command below :
thartono@thartono-linux:~$ route
Kernel IP routing table
Destination Gateway Genmask Flags Metric Ref Use Iface
dns-xx.xxxxx.co * 255.255.255.255 UH 0 0 0 tun0
dns-xxx.xxxxx.c * 255.255.255.255 UH 0 0 0 tun0
xxx-vpn-cluster jkr-vlan300-hsr 255.255.255.255 UGH 0 0 0 eth1
64.104.68.0 * 255.255.255.0 U 0 0 0 eth1
192.168.184.0 * 255.255.255.0 U 0 0 0 vmnet1
192.168.207.0 * 255.255.255.0 U 0 0 0 vmnet8
171.71.0.0 * 255.255.0.0 U 0 0 0 tun0
171.70.0.0 * 255.255.0.0 U 0 0 0 tun0
link-local * 255.255.0.0 U 1000 0 0 eth1
default xxx-vlan300-hsr 0.0.0.0 UG 0 0 0 eth1
Sunday, July 1, 2007
SOCKS Proxy
If your VPNClient software does not work well on your network/location (may be because of timeout issue), you could use create SOCKS proxy instead. Based on my experience, SOCKS Proxy is more reliable than VPNClient. I tried to disconnect the network for 3.5 minutes, and SSH tunnel still up.
SOCKS Proxy is builtin and could be initiated by this command :
ssh -D 1080 username@ssh.company.com
SOCKS Proxy could be used with any browser (Firefox) and email client (Thunderbird+Lightning). If you want to use it with Evolution, you will need tsocks. Install tsocks with this command :
sudo apt-get install tsocks
and you could tunnel Evolution with this command :
tsocks evolution
If you are using Thunderbird, you could configure the socks proxy inside Thunderbird. But if you're using LDAP with Thunderbird, you have to tunnel Thunderbird with tsocks, otherwise LDAP will be failed :
tsocks thunderbird
Replacing VPNClient+Outlook with SOCKS Proxy+Thunderbird+Lightning
Install Thunderbird
Download thunderbird version 2 and place it to Desktop
I want to install Thunderbird into my /opt directory :
cd /opt
sudo tar -zxvf ~/Desktop/thunderbird-2.0.0.4.tar.gz
cd thunderbird
./thunderbird
Offline Folders
Thunderbird support offline folders. The contents of the folders will be available at anytime even though you are not connected to the network.
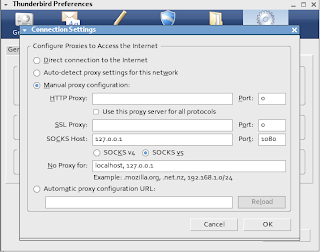
Use SOCKS Proxy with Thunderbird
Preferences - Advanced - Connection - Manual Proxy - Socks Host : 127.0.0.1 port 1080
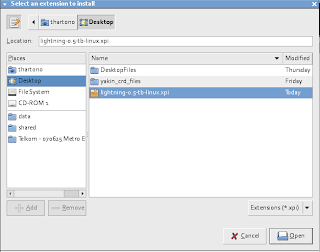
Install Lightning
Download Lightning and place it to Desktop
From Thunderbird, select Tools - Add-Ons - Installs - and select the downloaded file.
Issue with Lightning and Exchange Calendar
I can accept any calendar invitation, but I can not send a calendar invitation. I have to use OWA or my push client software (Goodlink - installed on my smartphone).
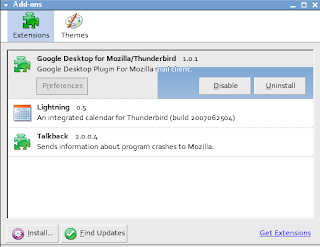
Setup Google Desktop Linux for Thunderbird
Go to your Firefox or Thunderbird extensions directory. In my case it is in the /opt/thunderbird/extensions, so :
cd /opt/thunderbird/extensions
sudo ln -s /opt/google/desktop/plugin/thunderbird/ desktop@google.com
Restart Thunderbird, and verify that google desktop already inside the add-on :
Download thunderbird version 2 and place it to Desktop
I want to install Thunderbird into my /opt directory :
cd /opt
sudo tar -zxvf ~/Desktop/thunderbird-2.0.0.4.tar.gz
cd thunderbird
./thunderbird
Offline Folders
Thunderbird support offline folders. The contents of the folders will be available at anytime even though you are not connected to the network.
Use SOCKS Proxy with Thunderbird
Preferences - Advanced - Connection - Manual Proxy - Socks Host : 127.0.0.1 port 1080

Install Lightning
Download Lightning and place it to Desktop
From Thunderbird, select Tools - Add-Ons - Installs - and select the downloaded file.

Issue with Lightning and Exchange Calendar
I can accept any calendar invitation, but I can not send a calendar invitation. I have to use OWA or my push client software (Goodlink - installed on my smartphone).
Setup Google Desktop Linux for Thunderbird
Go to your Firefox or Thunderbird extensions directory. In my case it is in the /opt/thunderbird/extensions, so :
cd /opt/thunderbird/extensions
sudo ln -s /opt/google/desktop/plugin/thunderbird/ desktop@google.com
Restart Thunderbird, and verify that google desktop already inside the add-on :

Subscribe to:
Comments (Atom)